| OVH SYSTEM TRAY (Web navigation made easy..) | |||
|
OVH SystemTray is a FREE customizable desktop utility system tray that takes away the painful job of having to memorize and type URL address for different domain names that you use in a daily bases at your work place. You get to organize your URLs and group them as well as order them in a manner you want depending on how often you get to access them. 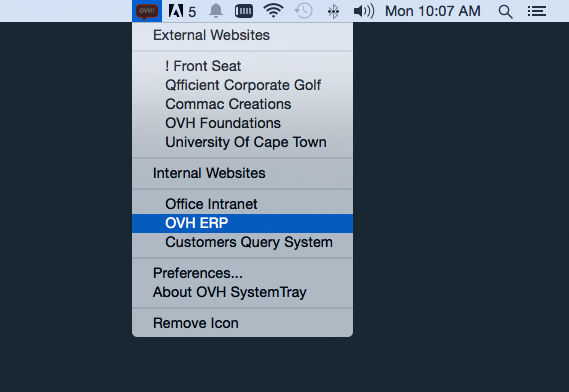 |
|||
System Preferences (How to specify XML Path?): | |||
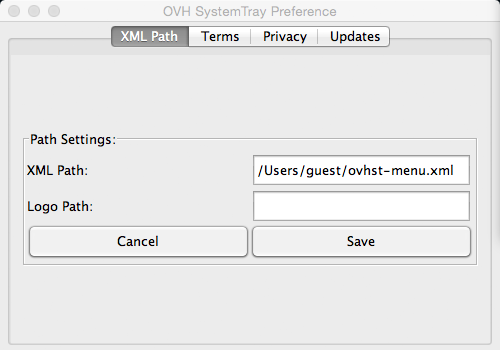 Steps on how to specify xml menu file:
|
|||
List of Files to include: | |||
|
1. OVHSystemTray.exe: Windows executable file.
This is what you must run or execute in order to utilize OVH SystemTray. 2. ovhst-menu.xml: XML file that feeds System Tray with the actual customized menu. This XML file can be placed anywhere as long as the path is specified on the system Preference Window under "XML Paths" tab. NB: This is where you get to customize your menu. Example of an XML Node: 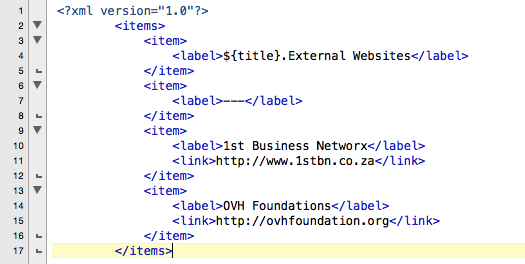 XML Syntax:
3. start-logo.png: A 24x24 pixels .png logo that will be displayed on the task bar or tray. This XML file can be placed anywhere as long as the path is specified on the system Preference Window under "XML Paths" tab. This file has to be dumped int to the folder: "C:/ovh/systemtray/", the final path should be: "C:/ovh/systemtray/start-logo.png" NB: TAgain you can replace this by your own or organization logo. |
|||
Downloads: | » Privacy Statement | ||
|
Download OVH SystemTray
Go to External Website |
|||
-: OVH Laboratory |
| » Quantum Mechanics |
| » Electronics & Robotics |
| » ADC Experiment |
| » Astronomy & Physics |
-: Research Projects |
| » OVH Server Basement |
| » OVH Health Management System |
| » Farm Case Management System |
| » OVH System Tray |
| » Validation Matrix |
-: Community Based Projects |
| » Commac Cup Tournaments |
| » CC. Football Tournament |
| » CC. Golf Tournament |
| » UCT Hip Hop Club |
| » Anone Primary School |
-: Distribution Partners |
| » SHAWCO - UCT |
| » TSHIMBONI - VENDA |
-: Associative Research Partners |
| » UCT - Computer Science Department |
| » Stanford University |